📌 Key Takeaways
This blog explains how to properly install a retractable awning, from choosing a suitable mounting surface and preparing the right tools to measuring, securing brackets, and testing the awning. It covers the benefits of retractable awnings, installation precautions, maintenance tips, and the differences between manual and motorized models. The guide also highlights when professional installation is the safer choice, especially for complex walls, electrical connections, or larger awnings.
Mounting a motorized or manually operated shade structure to an exterior wall – that’s the short version of what retractable awning installation actually involves. Anchor it securely enough to survive repeated extension, retraction, and whatever wind shows up on a random afternoon. Get the mounting wrong, though, and the whole assembly sags, jams, or, in worse cases, pulls loose from the wall entirely under load.
For homeowners considering retractable awnings for homes, proper installation is just as important as choosing the right size, material, and operating system. What follows covers what a retractable awning actually is, why people bother installing them, what prep work matters before the drill comes out, and the steps involved in getting one up correctly – plus when the DIY route genuinely stops making sense.
Understanding Retractable Awnings
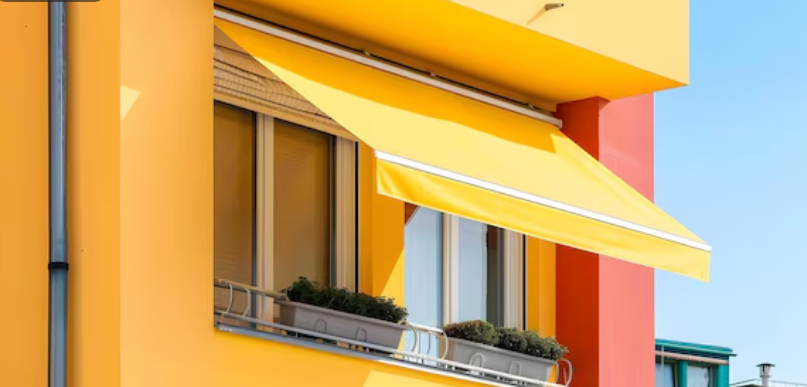
A fabric canopy, mounted to an exterior wall and supported by a folding metal arm system that extends outward and retracts back against the house – that’s a retractable outdoor awning in a nutshell. Unlike a fixed awning, it opens for shade and closes for storage, weather protection, or just because nobody wants fabric flapping violently in a storm.
Two categories cover most models. Manual awnings extend and retract with a hand crank – cheaper, mechanically simpler, fewer parts that can eventually fail on you. Motorized versions run on an electric motor, controllable by remote or, increasingly, a phone app, and they’ve become the go-to for larger installations where cranking out twenty feet of fabric by hand just isn’t appealing to most people.
Lateral Arm vs. Drop Arm Styles
Lateral arm awnings are what most people picture – extending horizontally from the wall, working well over patios and decks. Drop arm awnings extend more diagonally instead, better suited for blocking low afternoon sun on a window or smaller opening where a horizontal arm simply wouldn’t fit.
Benefits of Installing a Retractable Awning
People install these for reasons well beyond simple shade, though shade is obviously the headline benefit.
- Indoor temperatures drop noticeably during summer, easing the load on air conditioning
- Outdoor furniture, decking, and flooring stay protected from UV fading over time
- Usable outdoor living space stretches into hot or lightly rainy days that would otherwise be a wash
- Full retraction avoids the permanent shadow and upkeep burden that comes with a fixed structure
- Resale value can genuinely tick up, especially in warmer climates where outdoor space matters to buyers
A lot of homeowners underestimate how much this changes daily habits, honestly. A patio that’s unusable past 11 AM in July suddenly stays usable all afternoon, and that’s not a small shift if outdoor space was part of the reason the house got bought in the first place.
Preparing for Installation
Rushing straight to drilling holes is probably the single most common mistake homeowners make, and it shows up in nearly every retractable awning installation guide worth reading.
Check the Mounting Surface
The wall needs to handle real, ongoing stress – not just the awning’s static weight, but the force of wind catching an extended fabric panel mid-gust. Brick, concrete, solid wood framing, these generally hold up fine. Vinyl siding or stucco alone usually doesn’t, and mounting directly into either without reaching solid structural backing behind it is asking for trouble later.
Gather the Right Tools
A stud finder, a masonry or wood drill bit depending on the wall, a socket wrench, a level, lag bolts matched to the mounting surface – that’s the core list of retractable awning installation tools. Add a second person to that list too, since most awnings are too heavy and awkward for one person to hold steady while marking bolt holes solo.
Measure Twice
Confirm mounting height first, generally 8 to 10 feet for most residential setups, then check that the fully extended awning clears any door, gutter, or overhanging tree branch. A tape measure and a bit of patience here beats a genuinely frustrating re-mount down the road.
Step-by-Step Installation Guide
Order matters more than speed when it comes to the actual retractable awning installation steps.
Locate wall studs or confirm masonry anchoring points first, using a stud finder or manual inspection. Mark bracket positions using the manufacturer’s template, checking level at every single mark before drilling anything at all. Drill pilot holes sized correctly for the lag bolts in use – undersized holes crack surrounding material, oversized ones won’t hold securely.
Attach the mounting brackets first, torquing bolts to the manufacturer’s spec rather than eyeballing “tight enough by feel.” Lift the awning frame into place, ideally with a second person supporting the opposite end, then secure it to the brackets. Motorized units need electrical connections wired in at this point too, typically a dedicated outlet or hardwired setup depending on local code requirements.
Test the extension and retraction mechanism fully before calling the job done. Run it out and back in a couple of times. Listen for anything unusual – binding, catching, odd noise, anything that doesn’t feel smooth.
Retractable Awning Installation Precautions
A handful of precautions genuinely head off the most common problems. Never mount into siding alone without confirming solid backing behind it first. Skip installing during high wind, since holding a large fabric panel steady in a gust is both hard and genuinely risky. And check local permit requirements ahead of time – some municipalities require one for anything projecting past a certain distance from the exterior wall.
Maintenance and Care
Even a properly installed awning needs occasional attention to keep working well for years instead of degrading in a single season.
Clean the fabric periodically with mild soap and water, steering clear of harsh chemicals that break down water-resistant coatings over time. Check mounting bolts once a year, since seasonal temperature swings loosen hardware gradually without anyone noticing. Retract the awning during storms or heavy wind no matter how sturdy it feels extended – manufacturers rarely rate these for severe weather exposure. Lubricate moving joints on manual models now and then, and keep motorized units clear of debris around the motor housing.
Conclusion
Retractable awning installation isn’t an overly complicated project, but shortcuts show up fast here, usually as a sagging arm or a bracket pulling loose within the first year. Solid mounting surfaces, the right tools, careful measurement, and a bit of patience during the actual install—that combination separates an awning that lasts fifteen years from one that turns into a recurring headache. Anyone unsure about wall composition, electrical wiring for motorized units, or simply short on a second set of hands should lean toward professional installation. At BlueChip Shutter & Blinds, professional installation helps ensure your retractable awning is properly measured, securely mounted, and ready for reliable long-term use.
FAQs
How long does retractable awning installation take?
A straightforward manual install usually runs two to four hours with two people working together. Motorized units with electrical wiring take longer, often a full day, especially if a dedicated circuit needs running.
Can a retractable awning be installed on any home?
Most homes can handle one, but the mounting surface matters a lot. Solid masonry or properly reinforced framing works best, while siding-only walls often need additional structural backing first.
Should I install a retractable awning myself?
Smaller, manual awnings are reasonable for an experienced DIYer with the right tools and a helper on hand. Larger or motorized units, particularly anything needing electrical work, are usually better left to a professional.
How much space is needed to install a retractable awning?
Beyond the mounting wall, the space out front needs to stay clear for the full extension length, typically somewhere between 8 and 15 feet depending on the model.
What should I expect during a professional awning installation?
A professional installer typically checks the mounting surface, confirms measurements, handles any electrical work motorized units require, and tests the mechanism thoroughly before calling the job finished.
Why choose BlueChip for retractable awning installation?
BlueChip brings trained installers who assess mounting surfaces correctly the first time, handle electrical wiring for motorized units safely, and back the installation with follow-up support if anything needs adjusting later.